
Have you ever done a solar street light installation? Whether you’re a seasoned expert or a newcomer to the world of solar lighting, we’ve got just the right type of information for you. In this comprehensive guide, we’ll walk you through the essential steps and considerations for a successful solar street light installation. From selecting the ideal location to ensuring optimal performance and efficiency, we’ll cover it all. So, let’s dive in. For the fundamentals of how these systems work, our guide on the solar street light working principle is a helpful companion read.
What to Keep in Mind When Doing a Solar Street Light Installation
Are you ready to begin your installation task? Let’s discover what makes a solar street light installation a seamless and empowering experience.
Planning and Design
Effective planning and meticulous design are crucial steps in ensuring a smooth and successful solar street light installation. What steps should you take?
- Site Assessment: Conduct a comprehensive site assessment to determine the optimal locations for your solar street light installation. Consider factors such as sunlight exposure, shading, and surrounding infrastructure.
- Load Analysis: Calculate the energy requirements of the intended lighting system by performing a thorough load analysis. Identify the specific lighting needs and duration of operation to determine the capacity of the solar panels, battery storage, and LED fixtures. Our guide on battery powered street lights explains how to calculate battery requirements.
- Solar Panel Orientation and Tilt: Optimize the orientation and tilt angle of solar panels to capture sunlight efficiently. Align the panels to face true south (in the northern hemisphere) or true north (in the southern hemisphere) for maximum exposure. Adjust the tilt angle based on the latitude of the installation site.
- Battery Sizing and Placement: Select and size the battery bank to store excess energy generated during the day for nighttime use. Proper battery sizing prevents system overloading or underutilization.
- LED Fixture Design: Choose LED fixtures that align with the specified lighting requirements and integrate them into the overall system design. Ensure the fixtures are compatible with the solar street light’s voltage and offer the desired luminosity. Properly position the fixtures for optimal light distribution.
- Wiring and Control Systems: Design an efficient wiring layout and implement a reliable control system. Proper wiring reduces energy losses and enhances the overall performance of the solar street light installation. Incorporate intelligent control systems learn more in our guide to the solar street light controller.
Components and Materials You Need
To carry out your solar street light installation effectively, ensure you have the following components and materials:
- Solar Panel: Obtain high efficiency solar panels with the appropriate wattage to harness solar energy efficiently.
- Light Fixture: Select a durable and energy efficient LED light fixture suitable for outdoor use.
- Battery: Choose a reliable and long lasting rechargeable battery to store solar energy for nighttime operation.
- Controller: Acquire a solar charge controller to regulate the charging and discharging of the battery, ensuring optimal performance.
- Pole: Procure a sturdy and weather resistant pole to mount the solar panel and light fixture securely. Our 9 factors for choosing solar power light poles can guide this choice.
- Mounting Hardware: Gather the necessary nuts, bolts, and brackets for a secure and stable installation on the pole.
- Concrete Base: Prepare a solid concrete base to anchor the pole securely and provide stability.
- Wiring and Connectors: Have high quality wiring and connectors to establish proper connections between the solar panel, battery, controller, and light fixture.
- Tools: Ensure you have essential tools such as drills, screwdrivers, wrenches, and a voltage meter for installation and testing.
- Safety Equipment: Prioritize safety by using personal protective equipment (PPE) such as gloves, safety glasses, and a hard hat.
- Instruction Manual: Refer to the manufacturer’s installation manual for specific guidelines and best practices during the installation process.
- Permits and Documentation: Obtain any required permits and documentation before starting the solar street light installation to comply with local regulations. Carry wiring diagrams and product specifications for reference.
- Quality Control Checklist: Develop a checklist to systematically inspect and ensure the proper functioning of each component after installation.
Solar Street Light Installation Process
So, what are the exact steps you should take for an effective solar street light installation?
Foundation Preparation
Preparing a solid foundation is essential for the stability and longevity of the solar street light installation. Begin by excavating a hole of appropriate size and depth according to the specifications provided. Once the hole is ready, mix the concrete thoroughly and pour it into the excavation. It is crucial to ensure a level surface to guarantee the pole’s stability. Proper curing time for the concrete is necessary to achieve the required strength, ensuring the foundation can support the weight of the entire solar street light system and withstand environmental conditions.
Mounting the Pole
Attaching the pole securely to the foundation is a critical step in the installation process. Use suitable bolts and brackets to connect the pole, ensuring it is perfectly vertical. The use of a level is indispensable in achieving the desired alignment. The stability of the pole is paramount to the overall structural integrity of the solar street light system. By securely fastening the pole, you create a solid base for the subsequent installation of the solar panel and light fixture, minimizing the risk of misalignment or instability.
Attaching the Solar Panel
Mounting the solar panel on top of the pole is a pivotal step to ensure optimal energy absorption. Use brackets designed for secure attachment, and position the solar panel to face the sun directly. This orientation maximizes sunlight exposure throughout the day, enhancing the efficiency of the solar panel. By carefully securing the solar panel at the correct angle and direction, you set the stage for a system that can consistently convert solar energy into electrical power, essential for sustaining the solar street light’s operation. Learn more in our post on what photovoltaic street lights are.
Connecting the Battery and Controller
The connection of the rechargeable battery and solar charge controller is a critical aspect of the solar street light system. Ensure correct polarity during the wiring process and use appropriate wire connectors for secure and weather resistant connections. The battery stores the harvested solar energy, while the controller manages the charging and discharging cycles, optimizing energy utilization. A meticulous wiring connection ensures seamless communication between the solar panel, battery, and controller, creating a reliable and efficient energy storage and management system.
Mounting the Light Fixture
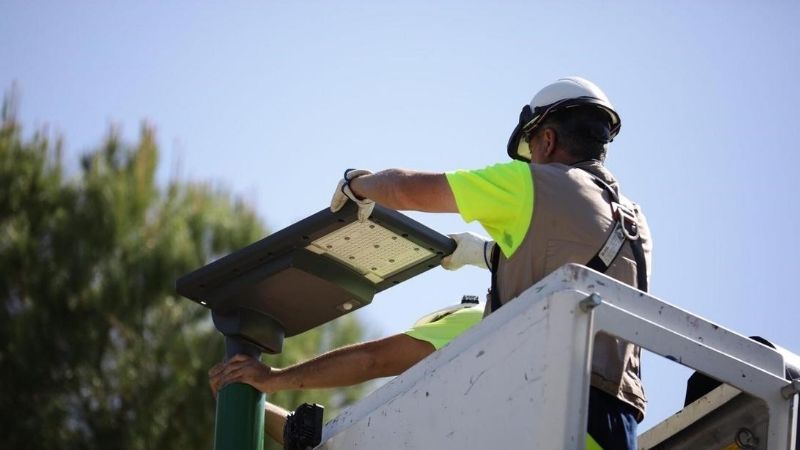
Attaching the LED light fixture to the pole is a key step in the solar street light installation process. Secure the fixture at the desired height and angle to achieve optimal illumination coverage. Use robust bolts and brackets to ensure the fixture remains stable and resistant to environmental conditions. Proper mounting of the light fixture not only enhances the aesthetic appeal of the installation but also guarantees effective and reliable lighting for the designated area. Our guide on how to calculate the distance for LED solar area lights helps with fixture height and spacing.
Wiring Connections
The routing and connection of wires are crucial to establishing a functional and reliable solar street light system. Carefully route wires from the solar panel, battery, controller, and LED light fixture. Use wire strippers to prepare wire ends, and secure connections tightly to prevent any potential issues. A well executed wiring connection ensures the seamless flow of electrical energy between components, minimizing energy loss and enhancing the overall efficiency of the solar street light system. Attention to detail in this step is essential for the long term reliability and performance of the installation.
System Testing
Before finalizing the solar street light installation, conduct a comprehensive system test to ensure all components are functioning correctly. Verify that the solar street light produces the expected level of illumination and that the controller is effectively managing the charging and discharging cycles. Testing the system under various conditions allows for the identification and resolution of any potential issues before deployment. A successful system test is a crucial step in delivering a reliable and efficient solar street light installation that meets performance expectations. If any problems arise, our guide on 5 ways to fix a solar light not working can help.
Final Adjustments
After the initial system test, make any necessary adjustments to optimize performance. Fine tune the solar panel angle, adjust the light fixture orientation, or configure the controller settings as needed. These final adjustments ensure that the solar street light system is tailored to the specific environmental conditions and lighting requirements of the installation site.

Maintenance of the Solar Street Light
As a solar street light installer, it’s imperative to prioritize maintenance considerations from the inception of the solar street light installation process. Addressing maintenance concerns during the installation phase serves multiple purposes, such as:
- By aligning components correctly, securely mounting fixtures, and ensuring proper wiring, you minimize the risk of potential issues down the line.
- A focus on maintenance during installation enhances the overall efficiency of the solar street light. Calibration of key components, such as photovoltaic panels and batteries, guarantees optimal energy capture and storage.
- Thorough checks of electrical connections and component integrity at the outset significantly reduce the likelihood of unexpected breakdowns.
Implementing a structured maintenance schedule is pivotal to the long term success of solar street light installations. Regular inspections form the cornerstone of this approach. What should you inspect? Regular inspections of connections, wiring, and the functionality of controllers and sensors ensure accurate system operation. A dedicated battery maintenance routine, encompassing voltage checks and capacity assessments, is imperative for sustained performance. Inspecting the integrity of light fixtures is another essential aspect of the maintenance schedule. Confirming secure mounting and proper angles, along with regular cleaning, maintains optimal illumination levels. Our 6 tips for solar street light maintenance provide a full routine.
In the era of smart technology, connectivity plays a pivotal role in facilitating timely maintenance updates. Integrating remote monitoring systems allows you to track the performance of the solar street lights in real time. Instant notifications of any anomalies enable swift responses to maintenance needs. Discover more in our post on the 9 benefits of solar light remote control technology.
Solar Street Light Installation Tips from Experts
- Position solar panels in a location with maximum exposure to sunlight, preferably at an angle equal to the latitude of the installation site.
- Calculate and set the tilt angle of solar panels based on the seasonal variations in the sun’s position. This adjustment maximizes the incident solar radiation.
- Accurately determine the battery capacity by considering factors such as daily energy consumption, autonomy days, and temperature variations.
- Employ a quality charge controller to regulate the charging and discharging of batteries. Set appropriate charging parameters to prevent overcharging and deep discharging.
- Integrate intelligent lighting controls, such as motion sensors and programmable timers, to optimize energy usage. See the 8 benefits of a solar sensor street light.
- Use high quality, UV resistant cables for wiring connections to minimize energy losses. Employ waterproof connectors and conduits to protect against environmental factors.
- Opt for high efficiency LED fixtures with advanced optics to maximize light distribution. Install fixtures at an optimal height and spacing.
- Implement a comprehensive monitoring system to track solar panel performance, battery status, and overall system health. Regularly analyze data to identify potential issues.
- Develop a routine maintenance schedule, including cleaning solar panels, inspecting connections, and testing system components.
- Ensure compliance with local regulations and standards regarding your solar street light installation. Obtain necessary permits and approvals to avoid legal complications.

Conclusion
Was your installation successful? Congratulations on completing the solar street light installation. By following this detailed guide, you’ve not only illuminated the streets but also contributed to a sustainable and eco friendly environment. A well executed solar street light installation delivers years of reliable, cost effective lighting. We hope you found our guide worth the read. Have any questions? Contact us.
Frequently Asked Questions (FAQs)
- How difficult is a solar street light installation?
A solar street light installation is straightforward compared to traditional lighting because it requires no grid connection or extensive trenching. The main steps are preparing a concrete foundation, mounting the pole, attaching the panel, connecting the battery and controller, mounting the fixture, wiring, and testing. Basic tools and safety gear are essential.
- Which direction should the solar panel face during solar street light installation?
During a solar street light installation, the solar panel should face true south in the northern hemisphere and true north in the southern hemisphere for maximum sunlight exposure. The tilt angle should be adjusted based on the latitude of the installation site.
- Do I need a concrete foundation for a solar street light installation?
Yes. A solid concrete foundation is essential for a solar street light installation to anchor the pole securely and provide stability. The concrete must be properly cured to reach full strength so it can support the system’s weight and withstand wind and weather.
- Do I need permits for a solar street light installation?
In many areas, yes. Before starting a solar street light installation, you should obtain any required permits and documentation to comply with local regulations. Requirements vary by location, so check with your local authority and keep wiring diagrams and specifications on hand.
- How do I maintain a solar street light after installation?
After a solar street light installation, maintain it by regularly cleaning the solar panel, inspecting wiring and connections, checking battery voltage and capacity, confirming secure fixture mounting, and testing the controller and sensors. Remote monitoring systems make it easier to catch issues early.